Picture this: that incredible aroma wafting from your kitchen, a bubbling, golden-brown masterpiece fresh from the oven, beckoning everyone to the table.
Ah, homemade lasagna – it’s more than just a meal; it’s a warm hug, a culinary triumph, and for me, a truly nostalgic experience that instantly makes any gathering feel special.
I know what you’re thinking – ‘Lasagna? That’s too complicated for a weeknight!’ And trust me, I felt the same way for years. But after countless experiments (and a few delicious failures!), I’ve cracked the code to making an absolutely sensational, crowd-pleasing lasagna that’s surprisingly achievable for any home cook.
In our fast-paced world, carving out time for a truly satisfying, home-cooked meal feels like a luxury, doesn’t it? But there’s a timeless magic in gathering loved ones around a dish made with love, and homemade lasagna truly embodies that spirit, bringing joy and connection that future generations will cherish.
It’s the ultimate comfort food comeback, if you ask me! If you’re ready to impress your family, delight your friends, or simply treat yourself to a slice of pure culinary bliss, you’ve come to the right place.
Forget those store-bought versions – once you taste *your own* homemade lasagna, there’s no going back. I’m so excited to share all my hard-won secrets and tips with you!
Let’s dive in and find out more.
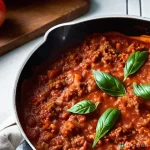
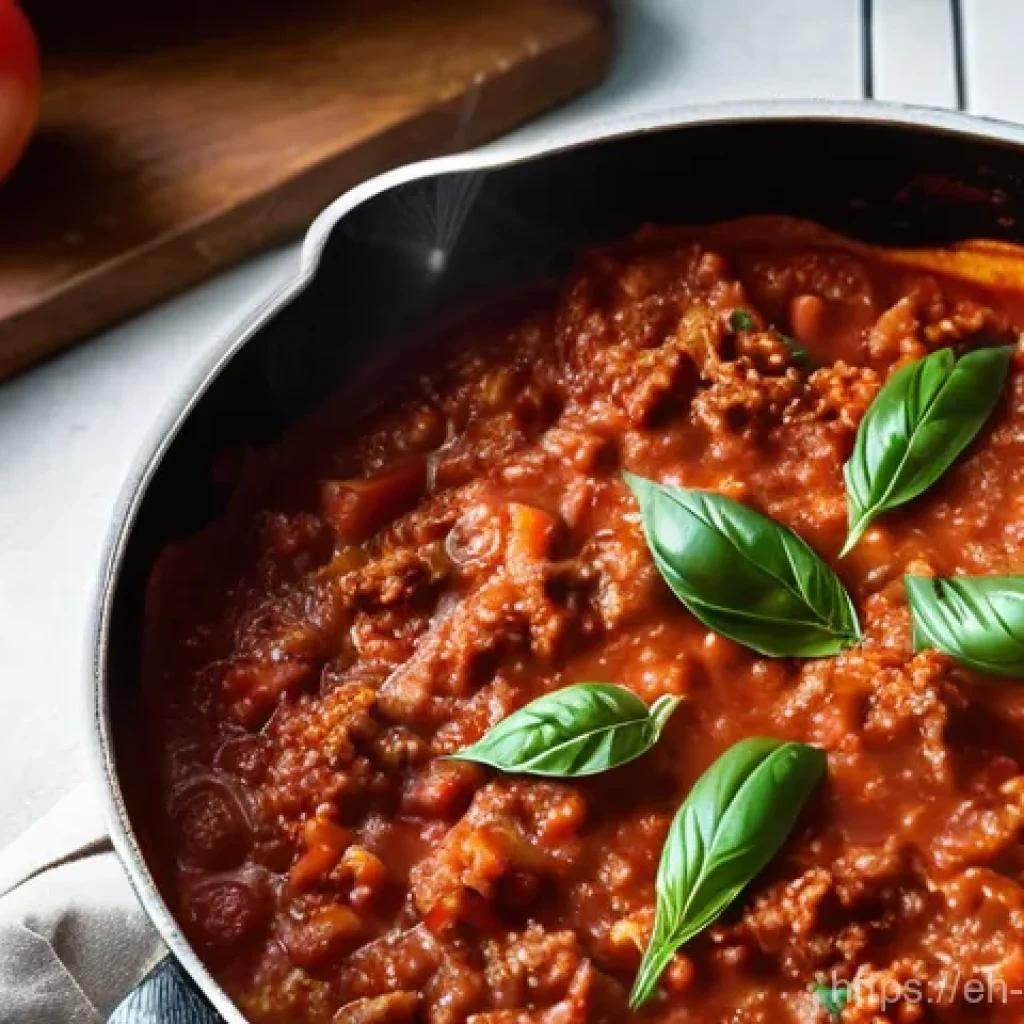
Mastering the Sauce: The Heart of Your Lasagna

Okay, let’s be real. If your sauce isn’t singing, your lasagna is just… well, a casserole. And nobody wants just a casserole when they’re dreaming of lasagna! For me, the sauce is where the magic truly begins. I’ve tried so many different approaches over the years, from quick weeknight versions to those that simmer all day, and what I’ve learned is that a little patience here pays off in huge flavor dividends. You want that rich, deep, umami explosion that coats your tongue and makes you close your eyes in pure bliss. Forget those jarred sauces for a moment – once you craft your own, you’ll understand what I mean. It’s about building layers of flavor, starting with a good sofrito of finely diced onions, carrots, and celery, cooked slowly until sweet and translucent. This isn’t a step to rush, my friends. This is your foundation, and a solid foundation makes for an unforgettable meal. Trust me, I’ve had my share of bland, watery sauces in my early days, and the difference a well-made sauce makes is truly night and day. It’s like the difference between a quick sketch and a fully rendered masterpiece.
The Simmering Secret to Rich Flavor
My biggest secret weapon for an incredible sauce? Time. I know, I know, we’re all busy, but seriously, allowing your sauce to simmer gently for at least an hour, or even two, does wonders. It lets all those beautiful flavors meld and deepen, transforming individual ingredients into a harmonious symphony. I usually start with some good quality ground beef and sometimes a bit of Italian sausage for extra punch, browning it thoroughly before adding my aromatic veggies. Then comes the good stuff: crushed tomatoes, a splash of red wine (totally optional, but highly recommended for depth!), a bay leaf, and plenty of fresh basil and oregano. I remember one time, I was so pressed for time, I barely let it simmer, and while it was okay, it lacked that soul-satisfying depth. The next time, I let it bubble away while I did some laundry, and honestly, the house smelled amazing, and the taste? Unbeatable. It’s like a warm hug in a bowl, truly.
Elevating Your Bolognese Game
If you really want to take your lasagna to the next level, consider a proper Bolognese. This isn’t just a simple meat sauce; it’s a slow-cooked marvel. My personal twist involves a little bit of whole milk added towards the end of the browning stage – it creates this incredible tenderness in the meat and a velvety texture that’s just divine. I picked up this tip from an old Italian nonna’s recipe, and it totally changed my sauce game. I also love to add a tiny pinch of nutmeg; it’s a classic Bolognese secret that just enhances everything without being overpowering. Don’t be afraid to taste and adjust as you go. Does it need a little more salt? A pinch of sugar to balance the acidity of the tomatoes? Your palate is your best guide. Every time I make Bolognese from scratch, I feel like I’m connecting to generations of Italian cooks, and that, my friends, is a truly special feeling. It’s an investment of time, yes, but the reward is a truly magnificent sauce that will make your lasagna unforgettable.
Noodle Know-How: From No-Boil to Freshly Made
Choosing your lasagna noodles might seem straightforward, but it’s actually a pretty crucial decision that can drastically affect your final dish. Over the years, I’ve experimented with every type imaginable – from those convenient no-boil sheets to meticulously making fresh pasta from scratch. Each has its place, depending on your time constraints and your desired outcome. I remember my first few attempts with regular dried noodles, and I’d always undercook or overcook them, leading to either brittle or mushy layers. It was a learning curve, to say the least! The goal is always a tender, pliable noodle that holds up to the sauce and cheese without turning into a gummy mess. It’s about achieving that perfect al dente bite within the finished lasagna, where the noodles blend seamlessly with the other ingredients, offering just the right amount of structure.
Navigating the No-Boil vs. Traditional Debate
No-boil lasagna noodles are a godsend on busy weeknights, I won’t lie. I’ve used them countless times when time is of the essence, and they’ve saved me from ordering takeout. The key with no-boil is to ensure your sauce is quite moist, as the noodles absorb a lot of liquid during baking. If your sauce is too dry, you’ll end up with hard, crunchy edges, which is not what we want! I’ve learned to add a little extra liquid to my sauce when using them, or even a splash of water to the bottom of the pan. On the other hand, traditional dried noodles, which require pre-boiling, give you more control over the texture. I usually cook them a minute or two less than the package directions suggest, because they’ll continue to cook in the oven. My personal experience has taught me that rinsing them quickly in cold water after boiling prevents them from sticking together while you’re assembling, which is a lifesaver.
Embracing Fresh Pasta for a Gourmet Touch
If you’re feeling adventurous and want to elevate your lasagna to truly gourmet status, fresh pasta is the way to go. I used to be intimidated by making fresh pasta, thinking it was a monumental task, but after trying it a few times, I realized it’s incredibly rewarding. There’s something so satisfying about rolling out those silky-smooth sheets, knowing exactly what’s in them. The texture of fresh pasta in lasagna is unparalleled – it’s tender, delicate, and practically melts in your mouth. You don’t need to pre-boil fresh pasta for lasagna; it will cook perfectly in the oven absorbed by the sauce. This means fewer steps and less mess, oddly enough! I’ve even found that store-bought fresh pasta sheets work wonderfully if you don’t have time to make your own. It just adds that little extra something, that whisper of artisan quality, that makes everyone at the table say, “Wow!”
Crafting the Perfect Ricotta Layer: Creamy Bliss
Ah, the ricotta layer. For many, this is what truly defines a classic lasagna. But let’s be honest, a bland, watery ricotta layer can absolutely ruin your masterpiece. I’ve seen it happen, and I’ve even been guilty of it myself in my early cooking days! The goal here is a rich, creamy, and flavorful layer that perfectly complements the robust meat sauce and the savory cheeses. It shouldn’t be just plain ricotta; it needs a little personality, a little zhuzh. I always drain my ricotta first, especially if it seems a bit wet, by letting it sit in a colander lined with cheesecloth for about 30 minutes. This prevents your lasagna from getting watery. Trust me, this tiny step makes a huge difference. I learned this the hard way after one particularly soggy lasagna experience – never again!
Beyond Basic Ricotta: My Go-To Mix-ins
Just plain ricotta? Not in my kitchen! I believe in giving that ricotta some serious flavor. My absolute go-to blend involves fresh ricotta, an egg (it acts as a binder, preventing the cheese from oozing out during baking), a generous handful of freshly grated Parmesan or Pecorino Romano, and a good amount of finely chopped fresh parsley. If I’m feeling fancy, or have it on hand, a little bit of finely chopped fresh basil is also a fantastic addition. Seasoning is crucial here too: a good pinch of salt, freshly ground black pepper, and sometimes a tiny hint of garlic powder, just to round out the flavors without overpowering them. I remember one time, a friend tasted my lasagna and couldn’t quite pinpoint why the ricotta layer was so good, and when I told them about the egg and the Parmesan, their mind was blown. It’s these little touches that elevate a dish from good to unforgettable.
Achieving That Silky Smooth Texture
For me, the texture of the ricotta layer is almost as important as its flavor. You want it silky and smooth, not lumpy or dry. After mixing in all my goodies, I give it a good stir, making sure everything is evenly incorporated. Sometimes, if the ricotta seems a bit too thick, I might add a tiny splash of milk or even a tablespoon of the meat sauce to loosen it up just a touch, creating a more spreadable consistency. This helps ensure an even layer throughout the lasagna, which contributes to a beautiful cross-section when you finally slice into it. I’ve found that a rubber spatula is my best friend for spreading the ricotta evenly without disturbing the other layers. It’s all about creating that perfect balance between the savory meat, the tender noodles, and this creamy, dreamy cheese layer. It’s what makes each bite a little piece of heaven.
Assembling Your Masterpiece: Layers of Love
This is where all your hard work comes together! Assembling a lasagna is, for me, a truly meditative process. It’s like building a delicious edible skyscraper, layer by glorious layer. There’s a rhythm to it, a flow that, once you get the hang of it, feels incredibly satisfying. I’ve learned that a thoughtful approach to layering can prevent so many common lasagna woes – things like dry corners, soggy bottoms, or layers that simply don’t hold together. It’s not just about piling things up; it’s about creating a harmonious structure that will bake beautifully and slice cleanly. Every time I start layering, I can almost smell the finished product, and that anticipation is half the fun! This stage is also where you can really see the results of your earlier efforts with the sauce and ricotta, which makes it even more rewarding.
The Art of Layering: A Step-by-Step Guide
My tried-and-true layering strategy always starts with a thin coating of sauce at the bottom of the pan. This prevents the first layer of noodles from sticking and helps them cook evenly. Then, a layer of noodles, followed by a generous dollop of that glorious ricotta mixture, spread evenly to the edges. Next comes the meat sauce – I like to make sure there’s enough chunky goodness in each spoonful. And finally, a sprinkle of your chosen shredded cheese, usually mozzarella and a little more Parmesan. Repeat, repeat, repeat! I typically aim for three to four layers of noodles, ending with a generous blanket of sauce and plenty of shredded mozzarella and Parmesan on top for that irresistible golden crust. It’s a bit like painting, where each stroke contributes to the final picture. I remember one time, I got a little too enthusiastic with the cheese in one layer, and the whole thing was a bit top-heavy – so balance is key!
Preventing a Soggy Bottom: My Top Tips
Nobody wants a soggy bottom, especially not in a lasagna! This is a common pitfall, and I’ve picked up a few tricks to avoid it. First, as I mentioned, that initial thin layer of sauce at the very bottom is crucial. It creates a barrier and gives the noodles something to absorb without making them waterlogged. Second, don’t overdo it with the sauce in each layer. You want it moist, but not swimming. A good balance is key. Third, if you’re using traditional noodles that you’ve pre-boiled, make sure they’re well-drained. And finally, perhaps the most important tip: use a high-quality, whole-milk ricotta that you’ve drained if it seems watery. The excess moisture from ricotta is a huge culprit for soggy lasagna. By paying attention to these small details during assembly, you’ll ensure your lasagna holds its structure beautifully and offers that perfect, satisfying bite every single time.
| Ingredient Category | Classic Choice | Great Substitutions/Tips |
|---|---|---|
| Meat | Ground Beef & Italian Sausage | Ground turkey, lamb, or a mix of mushrooms & lentils for vegetarian options. |
| Noodles | Traditional Egg Pasta | No-boil lasagna sheets (add more sauce), fresh pasta sheets (no pre-boil needed), gluten-free options. |
| Ricotta Cheese | Whole Milk Ricotta | Cottage cheese (drained!), blend of ricotta & cream cheese for extra richness, or a dairy-free cashew cream for vegan. |
| Cheese Topping | Mozzarella & Parmesan | Provolone, Fontina, Gruyère for different flavor profiles. A dash of Pecorino Romano for sharper taste. |
| Sauce Base | Canned Crushed Tomatoes | Fresh plum tomatoes (blanched & peeled), fire-roasted tomatoes for smoky flavor, or a high-quality passata. |
Baking Brilliance: Achieving Golden-Brown Perfection

You’ve done all the hard work: the simmering sauce, the creamy ricotta, the careful layering. Now comes the moment of truth: the bake! This stage is often where people get a little nervous, but honestly, it’s mostly about managing heat and time to achieve that perfect bubbling, golden-brown crust and a thoroughly cooked interior. I’ve seen my fair share of pale, underbaked lasagnas and sadly, even some burnt ones (we all have our kitchen mishaps, right?). The goal is not just to heat it through, but to allow all those incredible flavors to meld together in the oven’s gentle embrace, creating a truly harmonious dish. It’s about creating that visual appeal – that glorious, bubbly top layer that makes everyone’s mouth water the moment it comes out of the oven. It’s the final flourish, the crowning glory of your culinary efforts.
The Foil Dilemma: When to Cover, When to Uncover
This is a question I get asked all the time: “Should I cover my lasagna with foil?” And my answer is almost always a resounding, “Yes, initially!” Covering the lasagna with aluminum foil for the first two-thirds of the baking time is crucial. It traps moisture, ensuring that the noodles cook through evenly and that the sauce stays luscious. It also prevents the top layer of cheese from burning before the rest of the lasagna is fully cooked. I’ve made the mistake of not covering it, and ended up with dry, crispy edges and a still-cold center – not ideal! Once it’s had its covered bake, I remove the foil for the last 15-20 minutes. This is when the magic happens: the cheese on top gets beautifully golden-brown, bubbly, and irresistible. That slight crispiness on top is absolutely essential for the ultimate lasagna experience, a textural contrast that makes each bite even more satisfying.
Don’t Rush the Rest: The Crucial Cooling Period
I know, I know, it’s agonizing. Your kitchen smells incredible, the lasagna looks perfect, and all you want to do is dig in! But please, for the love of perfectly sliced lasagna, resist the urge! Letting your lasagna rest for at least 15-20 minutes (and sometimes even longer, up to 30 minutes for a really big pan) after it comes out of the oven is absolutely, positively non-negotiable. This resting period allows the layers to set, the cheese to firm up slightly, and the sauce to redistribute. If you slice into it too soon, you’ll end up with a messy, collapsed pile of deliciousness, rather than neat, impressive slices. I’ve learned this lesson the hard way, trust me. I once carved into a hot lasagna too eagerly, and it basically imploded on the plate. It still tasted amazing, but it looked like a delicious disaster! So, grab a glass of wine, relax, and let your masterpiece settle. It’s worth the wait, I promise you.
Beyond the Classic: Exciting Lasagna Variations
While I adore a classic beef and ricotta lasagna, part of the joy of cooking is experimenting and trying new things! Over the years, I’ve ventured beyond the traditional, and discovered a whole world of lasagna possibilities that are just as delicious and often cater to different tastes or dietary preferences. It’s amazing how a few tweaks to the ingredients can completely transform the entire dish, giving it a fresh new personality. I’ve had friends tell me they don’t even like lasagna, only to fall head over heels for one of these variations! It goes to show that there’s a lasagna out there for everyone, and not being afraid to step outside the traditional recipe can lead to some truly delightful culinary discoveries. Plus, it keeps things exciting in the kitchen, which is always a bonus for a home cook like me!
Veggie Lasagna: A Delicious Plant-Based Twist
For my vegetarian friends, or simply for those nights when you want something a little lighter, a veggie lasagna is an absolute winner. Instead of meat, I load it up with an abundance of seasonal vegetables. My favorites include roasted zucchini, eggplant, bell peppers, and spinach. Sautéed mushrooms also add a wonderful umami depth. You can either incorporate these veggies into a tomato-based sauce or create a creamy béchamel sauce to bind them all together. I usually add some caramelized onions for sweetness and extra flavor. I once made a veggie lasagna for a potluck, and it was the first dish to disappear! People were genuinely surprised by how rich and satisfying it was, proving that you don’t always need meat to create a truly hearty and flavorful meal. It’s a fantastic way to get more vegetables into your diet, and it’s always a crowd-pleaser.
White Lasagna: Béchamel Beauty
If you’ve never experienced a white lasagna, you are truly missing out! This version swaps the tomato-based meat sauce for a luscious, creamy béchamel sauce, often paired with chicken, mushrooms, or even just a medley of cheeses. The béchamel adds an incredible richness and velvety texture that is completely different from a red lasagna. My favorite white lasagna features shredded rotisserie chicken, sautéed mushrooms, and sometimes a handful of fresh spinach, all bound together by a silky smooth béchamel infused with a touch of nutmeg. It’s elegant, comforting, and utterly decadent. I remember my first time trying to make béchamel from scratch, and I was so nervous about lumps! But with a whisk and steady stirring, it came out perfectly, and the result was a lasagna so good, it felt like it belonged in a fancy Italian restaurant. It’s a wonderful alternative for those who prefer creamier sauces or want a break from the classic tomato flavor.
Troubleshooting & Tips for Lasagna Success
Even after years of making lasagna, I still occasionally run into a little hiccup here and there. That’s just part of the joy (and sometimes frustration!) of cooking. But over time, you learn to anticipate problems and develop strategies to fix them, or better yet, avoid them altogether. Think of these as my personal “cheat codes” for ensuring your lasagna turns out amazing every single time, minimizing stress and maximizing deliciousness. I’ve definitely had those moments where I’ve thought, “Oh no, what have I done?” but with a few simple tricks, most minor issues can be easily remedied. It’s all about understanding the dynamics of the dish and having a few clever solutions up your sleeve. These tips come from real-world kitchen experience, not just textbook theories, so I hope they save you some headaches!
Common Lasagna Pitfalls and How to Avoid Them
Let’s talk about those annoying little problems that can crop up. One big one is dry lasagna. This usually happens if there isn’t enough sauce or if your no-boil noodles didn’t get enough liquid. Solution: be generous with your sauce, and if using no-boil, ensure your sauce is on the thinner side. Another common issue is a crumbly, falling-apart lasagna when you slice it. This is almost always due to not letting it rest long enough after baking. Remember, patience is a virtue here! Soggy bottom? We’ve already covered that: drain your ricotta and don’t overload with liquid. And if your cheese topping isn’t browning evenly, try moving the lasagna to a higher rack in the oven for the last few minutes, or even a quick broil (but watch it like a hawk!). These small adjustments can make a world of difference between a good lasagna and a truly spectacular one.
My Personal Time-Saving Hacks
I get it, lasagna can be a project. But it doesn’t always have to be! I’ve developed a few time-saving hacks for those busy days. First, make your meat sauce ahead of time. It actually tastes even better the next day! You can even freeze it. Second, if you’re really short on time, use a good quality store-bought fresh pasta – it saves the boiling step and gives you a fantastic result. Third, when making your ricotta mixture, gather all your ingredients first and then just dump them in and mix. No need to be overly precious. And finally, consider making a double batch! Lasagna freezes beautifully, either baked or unbaked. Then, on a busy weeknight, all you have to do is pop it in the oven. There’s nothing quite like pulling a homemade lasagna out of the freezer, knowing you’ve got a delicious, comforting meal ready to go with minimal effort. It’s my ultimate secret weapon for stress-free entertaining and delicious family dinners!
Wrapping It Up
And there you have it, my friends! We’ve journeyed through every delicious layer of crafting an unforgettable lasagna, from the heart of the sauce to that glorious golden-brown bake. I truly hope that sharing my own kitchen adventures, mishaps, and triumphs has inspired you to tie on an apron and dive into this wonderfully rewarding dish. Lasagna, for me, isn’t just a meal; it’s a labor of love, a connection to comfort, and a testament to how simple ingredients, given a little care and attention, can create something truly extraordinary. Don’t be afraid to make it your own, experiment with flavors, and most importantly, enjoy every single step of the process. Trust me, the smiles around the table when you serve up your masterpiece are absolutely priceless!
Good to Know Info for Your Next Lasagna
1. Always drain your ricotta: This is a game-changer! Excess moisture from undrained ricotta is a common culprit for watery lasagna, so take that extra step to let it sit in a colander for at least 30 minutes. It makes all the difference in achieving that perfectly firm and creamy layer.
2. Sauce first, always: Starting with a thin layer of sauce at the bottom of your baking dish is crucial. It acts as a barrier, preventing your first layer of noodles from sticking and ensuring they cook evenly without becoming too dry or hard around the edges.
3. Patience with the rest: I know it’s hard, but resisting the urge to slice into your hot lasagna immediately after it comes out of the oven is vital. A good 15-20 minute rest allows the layers to set and the cheese to firm up, resulting in beautifully neat slices instead of a messy pile.
4. Don’t skimp on fresh herbs: While dried herbs have their place, fresh basil and oregano, especially in the ricotta mixture and as a garnish, elevate the flavor profile immensely. It adds a vibrant freshness that truly brightens the rich flavors of the sauce and cheese.
5. Taste as you go: This is my golden rule for all cooking, and especially for lasagna. Season your meat, taste your sauce, adjust the ricotta mixture. Your palate is your best guide, ensuring that every component is perfectly balanced before it all comes together in the oven.
Key Takeaways for Lasagna Perfection
Creating a truly remarkable lasagna boils down to three core principles: investing in quality ingredients, exercising patience at each stage, and paying close attention to the details. From slowly simmering a deeply flavorful sauce and preparing a rich, seasoned ricotta, to carefully layering and allowing for a crucial resting period after baking, every step contributes to the final, unforgettable result. Don’t rush the process, trust your instincts, and enjoy the journey – the reward is a comforting, soul-satisfying dish that’s truly a labor of love.
Frequently Asked Questions (FAQ) 📖
Q: I’m always worried homemade lasagna will be too much work, or worse, turn out soggy! How can I make sure mine is a showstopper without all the stress?
A: Oh, I totally get this! For years, lasagna felt like this intimidating project, but trust me, it’s absolutely doable and so rewarding. The secret to a showstopper that isn’t a watery mess really boils down to a few key insights I’ve picked up over time.
First, let’s tackle soggy lasagna. This is often caused by too much moisture, either from the sauce or the cheese. My number one tip?
Make sure your meat sauce is nice and thick, not watery. Let it simmer uncovered for a bit longer than you think, so some of that liquid evaporates, and if you’re using fresh vegetables, cook them down first to release their moisture.
Next, for the cheese layer, if you’re using ricotta, drain it well! I usually put it in a fine-mesh sieve over a bowl for at least 30 minutes, sometimes longer, to get rid of excess water.
Some recipes even suggest adding an egg to the ricotta to help it bind, which can give you that lovely “layer cake” structure when you cut into it. And speaking of cheese, using low-moisture mozzarella rather than fresh mozzarella packed in water is a game-changer; fresh mozzarella can release a lot of liquid.
As for the noodles, if you’re using traditional ones, cook them al dente – just until they’re pliable, because they’ll continue cooking in the oven. Overcooked noodles absorb too much sauce and can make your lasagna mushy.
For an even easier route, I sometimes use no-boil lasagna sheets, but even then, ensure they’re completely covered by the sauce to cook properly. Finally, and this is crucial for preventing a runny lasagna, let it rest after it comes out of the oven.
I know, I know, the aroma is intoxicating, but trust me, giving it at least 15-30 minutes (or even longer!) allows those layers to set and the flavors to meld beautifully.
You’ll get clean, beautiful slices every single time. It really makes all the difference!
Q: What kind of cheese combination should I use for the best flavor and texture in my homemade lasagna? I want that perfect melty, gooey, yet structured result!
A: Oh, this is where the magic really happens, isn’t it? The cheese blend is absolutely critical for that dreamy lasagna experience – that balance of melty, gooey, savory, and creamy that makes everyone swoon.
From my own kitchen adventures, I’ve found that a trio of cheeses really hits the sweet spot, each playing its own distinct role. First up, and non-negotiable for that classic creamy texture, is ricotta cheese.
I always opt for whole milk ricotta because it’s richer and creamier. As I mentioned before, draining it thoroughly is key to avoid a watery lasagna, but once drained, it forms that lovely, soft layer.
Adding an egg to the ricotta mixture helps it set beautifully and keeps everything together. Next, for that incredible, stretchy, gooey factor, you absolutely need mozzarella.
Here’s my personal tip: go for low-moisture, pre-shredded mozzarella or a block you shred yourself. I learned the hard way that fresh mozzarella, while delicious on its own, releases too much water in the oven and can make your lasagna soupy.
You want that cheese to melt and bubble, not create a watery pool! And finally, for that punch of savory, salty, umami flavor, Parmesan (or Parmigiano-Reggiano if you’re feeling fancy) is essential.
I sprinkle this throughout the layers, not just on top. It adds depth and a wonderful sharpness that really elevates the whole dish. Some people even mix in a bit of Romano for an extra robust kick.
So, a combination of well-drained ricotta, low-moisture mozzarella, and plenty of Parmesan is my go-to for a lasagna that’s truly unforgettable. It’s all about layering these different textures and flavors for a symphony in every bite!
Q: Lasagna feels like a special occasion meal, but I’d love to make it more often. Can I prepare it ahead of time, or even freeze it, to make weeknight meals easier?
A: You are speaking my language! Lasagna is the ultimate make-ahead meal, and honestly, sometimes it tastes even better the next day as the flavors have more time to meld together.
This is one of my favorite “secret weapons” for busy weeks or when I’m hosting. There are a couple of fantastic ways to make lasagna ahead of time. The easiest method, which I use frequently, is to assemble the entire lasagna – all your layers of sauce, noodles, and cheese – and then simply cover it tightly with aluminum foil or plastic wrap.
You can pop it in the refrigerator for up to 24 hours, or even 48 hours in some cases, before baking. Just remember to let it sit at room temperature for about an hour before baking so it cooks evenly.
If you’re thinking even further ahead, you can absolutely freeze lasagna! You can assemble it, wrap it really well in heavy-duty foil (I usually do a couple of layers), and then freeze it for up to a month, sometimes even longer if it’s well-sealed.
When you’re ready to bake it, transfer it to the refrigerator to thaw for a day or two, then bake as usual, adding some extra baking time since it’s starting from a colder temperature.
Some folks even bake it first, let it cool completely, and then freeze individual portions or the whole pan. This method is great because you just have to reheat it!
Whichever route you choose, preparing lasagna in advance is a total lifesaver. It takes away the pressure on the day you want to serve it, allowing you to enjoy the process of cooking without the rush, and then savor the delicious outcome.
It’s a true gift to your future self, trust me!